Sunday, December 26, 2010

Milking our goat

We have been milking our goat twice a day for a week now, and her milk production is slowly increasing. We got 1 1/4 litre this morning. She is also getting more cooperative, getting on her own on the milking stand I built for her. Milking is still a little laborious for me, I obviously need to build some muscles in my hands.
The milking stand greatly improved the operation. It is built from recycled wood from our old deck. This is a good way to increase carbon sequestration.
Here is the milking stand:


At the first use I realizes that getting of the stand was not easy for the goat, since she had to back off, so I made one of the rails articulated.
To keep Poppy happy, I added a feed box where she gets her daily ration of goat chow:

Milking the goat has increased the labour needed every morning, so I will have to get up a little earlier now. If everything works well, Poppy will get milk for the next 10 months, then will be left to rest for 2 months before she kids again. The milk is delicious. Since we spend about $500 a year on milk, this should provide some savings.

Saturday, December 18, 2010

Feeding the babies

Poppy, our mother goat, is not too sure yet about what just happened to her. She is resisting milking, she is a lot more friendly with us, which is surprising considering the fight she gives at every milking. She does not recognize her kids, she walks away from them, even appearing scared by them. So we are left with bottle feeding the babies. Obviously, my family hates the experience, as we can see in the pictures below...

Kristen got the kids from their "brooder", while the milk was warming up:

Kristen getting the boy ready:

Kristen is feeding the boy under Mattias' watchful eyes ...

... while Karen is feeding the girl:

Poppy the mother is doing well, and her milk production is slowly increasing. There is barely enough to feed the kids at this point, but we did take a seep of her milk, and it tastes very good.

Friday, December 17, 2010

They Are Here! Baby Goats

Kristen got up early this morning, at around 5AM. She called us just after 6, telling us that two baby goats were born. We have a boy and a girl. Here is the girl:


The plastic box gives the scale, she is really tiny.
Here is the boy:


They seems both healthy. We are not sure if Poppy is done yet...
Good job Kristen!
Now I have to build the milking stand.

Saturday, November 13, 2010

Hatchery Update

Our first hatch happened on September 23rd, and some of our chicks are now fully feathered. we have chicks anywhere from 1 day old to 6 weeks old. Here is the latest hatch, a few hours old:

He will soon join his brothers in the comfortable 80 Fahrenheit of the brooder (the object in the foreground is the thermostat):

That will be a total of 6 young chicks. Once they have past about 2 weeks in the brooder, they go into the field brooder, outside. The field brooder has a shelter that is maintained at 60 Fahrenheit. They are free to go in and out of the sheltered area. We currently have 9 "juniors" in our field brooder:

After about a month, they have fully feathered, and they go into a similar pen, except the shelter is unheated. We have 9 "pre-teens" in the sheltered pen. Aren't they gorgeous?

We had two chicks die in the brooder. We also gave away three healthy chicks that later died at their new place. We have a total of 24 chicks currently alive, 23 are Black Australorps, 1 is an Ameraucana (our first, hatched yesterday!). Among all those chicks, about half will be roosters, so we can count on a dozen laying hens so far. If the rooster and the breeding hens are true Australorps, then these should be good layers. With parents raised on pasture, they should also be very healthy.

Sunday, November 7, 2010

Wild Visitors

Last week, we had a couple of deers browse in our pasture. The buck was pretty nice. While they were in the pasture, the goats were pretty freaked. Here is a pic of the buck:


Today, the whole deer family visited us. They were in the garden, I forgot to close the gate the day before. Fortunately, not much is growing right now. As we walked on the deck, they got nervous and walked out while I was taking the picture. There were a buck, a doe and 3 fawns.


During the past month, we processed our two bronze turkeys, and our 15 broilers. Out of the 15 broilers, one was killed by a predator, one died of a heart attack, and two were injured. We processed 11 out of 15. They were 12 weeks old Cornish. Next year, we will probably stick to red broilers.

Friday, September 24, 2010

Our Black Australorp Chicks

Two more chicks hatched today, and another egg has a big crack. Tomorrow, we should have 4 chicks. They are Black Australorp chicks, an excellent dual purpose breed for meat and eggs.
Here is a pic of our chicks, after they dried up:

Here is a link to Wikipedia on Black Austrlorps:
[ Black Australorps ]
Here is an exerpt found in several hatchery websites:

"This breed originated in Australia developed from Black Orpingtons imported from England; and the emphasis of the breeding program was on egg production without sacrificing too much in size and meat quality. Some sensational results were made in the Australian program, and one hen set a laying record of 364 eggs in 365 days. Introduced into this country in the 1920's, they have become useful and popular and are certainly one of the best layers of light brown eggs of all the heavy breeds. A flock of Black Australorps with their glossy black plumage which has a greenish-purple sheen and their larger than average bright red combs make an unusually handsome sight. They are big birds, cockerels weighing 6 to 8 pounds at maturity and pullets 5 to 7. They have a pinkish white skin and plump bodies which dress out nicely once the birds have their final plumage. Pullets mature early and many will be in production between 5 and 6 months of age. They are quiet, gentle, and stand confinement well. Baby chicks are black with a good deal of white in the underparts and small white patches around the head and wings. We have handled this breed for years and think it is one of the best of the heavy breeds."

Thursday, September 23, 2010

FIRST HATCH !!!

Today, we had our first chicken egg hatch. It has been 23 days since we started incubating our eggs (the first egg failed due to incorrect hatcher settings). There are two more eggs that show cracks. We will see what we get tomorrow.
Here is a picture of the hatched chick:

We have 6 more eggs (including two cracked) in the hatcher, and 19 more eggs in the incubator. After hatching, they will stay one to two weeks in the brooder, then 2 to 3 weeks in the field brooder. By then, the broiler tractor with its shelter, will be available. The shelter will be necessary, due to winter approaching. It will be quite a challenge to raise those chicks in the winter. They should start laying in the Spring.

Friday, September 17, 2010

Attila The Barn Cat

When we moved in our new home, it became clear that the barn had a family or rats living in. The previous owner used rat poison, I found a few old samples in different areas of the barn, which I removed while rats were watching me, crawling on top of the metal structure of the barn. I opted for another approach. We went to the pet store and ask for a mean cat. The lady at the store seem delighted by our request, put a thick glove on, and extracted a gray kitty from the cat cage. "Here, I have what you need!" she said, while the kitten was hissing ferociously.
We let the cat loose in the barn, and fed him minimally, so that he wouldn't starve, but would be hungry enough to hunt. I choose a name which I hoped would represent the same thing to the rat as it did to my ancestors: Attila.
The following day, we found 3 small rats drown in his bucket of water. I don't think he killed them, I think they got scared and drown trying to escape him. During the following week, a total of 7 rats were found drowned.
After a few months during which we barely saw Attila, we did not see any more rats in our barn. At some point, we did not see Attila for several weeks. We could hear coyotes howling, so we feared Attila had become their dinner. Then, one day, I saw Attila while I had my camera on hand. Here is the first shot of Attila:

Attila was feeding in the plate I set for him. I approach a little more, and he stepped away. I had time to set the zoom and get a better shot:

I got a little closer, and Attila decided that was enough. See you later Attila!

Tuesday, September 14, 2010

In the barn

This week end, I went into the goat stall to take some hay. The goats have been out since Spring, so the goat stall was left undisturbed after a rough cleaning a few months ago. When I entered the stall, I noticed something unusual on the ground. Here it is:

Nice mushrooms growing off the goat manure. Here is a shot lower to the ground, showing the stems:

A day later, we went back, and notice that the mushrooms had grown:

They also had a different shape (notice the snake skin in the foreground):

Mike took a cool close shot of underneath the top:

If we want to grow mushrooms, we know now where the best spot will be. The goats will have their own shelter outside, to free up the barn. We were thinking of renting it for horses, but that stall won't be rented.

Monday, September 13, 2010

Incubator update 3

I candled the eggs in the incubator that were 6 or more days old tonight. The earliest egg is 14 days old. All the eggs 12 days old or more are now showing an embryo moving inside the egg, 6 out of the 7 first eggs (one was infertile) are developing successfully so far.
There are 7 more eggs that are 6 to 8 days old. 5 are definitely showing blood vessels, and 2 are uncertain.
The remaining 6 eggs are 5 days old or less, and are not developed enough to show anything with my simple candling method (holding the egg and a CFL light bulb in my hands). I should invest in an LED light bulb just for candling.
The oldest egg should hatch next Monday, the first birth on our farm. If he succeeds, that chicken will be pampered.

Sunday, September 12, 2010

Peacock & Field Brooder

The peacock was moved to the field brooder outdoors yesterday. Here is a pic of the field brooder, with our ~ 1 month old peacock inside:

The field brooder is a 4FT*8FT pen with half covered and heated, and half open, on grass, with chicken wires overhead. This is an invention of mine which I thought would help chicks to get more progressively acclimated to outdoors. They can come in and out of the heated area, as if they were coming in and out from under their mother's wings. They choose how long they stay in each area. The heater is on a thermostat, the temperature is adjustable. The field brooder is on wheels, so it can be moved when the grass gets dirty.
The broiler chicks love getting on the grass, and they can be moved outdoor a lot sooner that normally, usually at 1 week of age instead of 2 weeks. They are then moved from the field brooder to the bigger unheated chicken tractor at 2 weeks of age (this was done yesterday for our latest broilers). Compared to the conventional brooder/tractor method, this brooder/field brooder/tractor allows the chicks to be put outdoor one week earlier than normal.
Since we are done for the season with broiler chicks, we are now using the field brooder for our peacock. A peacock should normally stays 4 months in the brooder. Our peacock just left the brooder at one month, and will spent his second month in the field brooder. This morning, after his first night outdoors, he was the center of attention of our free ranging birds. The layers, ducks, turkeys were all around, and even roosting on top of the field brooder, getting acquainted with the new kid on the field. Too bad I didn't have my camera on hand, it was just hilarious.
Here is a close up shot of the peacock in the field brooder:

Saturday, September 11, 2010

Chicks in new tractor

We moved the broiler chicks in their new tractor yesterday, they were getting crowded in the field brooder. They went from 16sqft of pasture to 50sqft, and they are loving it:

The tractor is made almost entirely of recycle material (wood from the old deck, roofing was given to me). I added a shelter area since it is getting rainier, and nights are cooler. This is the shelter, open for the pic:

This is the whole tractor, with the shelter attached:

It takes the chicks two days to make the grass dirty, and at the rate their feed intake is increasing, I will soon have to move them twice a day.
I hope this tractor will be big enough to hold 25 broilers. We'll see next year, this is our last batch for 2010.
Now that the field brooder is empty, the peacock, which is still in the brooder in our living room, will discover the great outdoors. We will set him in the field brooder.

Friday, September 10, 2010

Incubator Update 2

It has been 9 days yesterday since the first egg was set in the incubator. 7 of our eggs are at least 7 days old, so it was a good time to check these 7 eggs:
I found 4 eggs with blood vessels, one 8 days old egg clear (probably infertile), and two 7 days old eggs speckled, with no blood vessel yet. Speckled eggs are more difficult to successfully incubate, so those may be bad too, but I'll give it two more days to decide. The clear egg was removed from the incubator and put in the compost pile. It is risky to keep bad eggs in the incubator, as they may get infected with bacteria which will decompose them, producing gazes that will eventually make the egg explode, contaminating (killing) all the other eggs in the incubator.

I also added a piece of wet cloth inside the incubator to maintain high humidity.

So far we have 4 out of 7 eggs developing blood vessels. That is the furthest we managed to go, our previous attempt failed to reach that milestone. Blood vessels show that the egg is fertile, and started to develop, so from that point on, it is all about temperature and humidity, for the 13 to 14 days that remain until hatching (21 days total).

End of September, we may have peeping sounds coming from the incubator.
This gave me another business idea: next year, we may sell chicken tractors with up to 8 laying hens, to get you started with your own fresh eggs immediately, like a turn-key system. The chicken tractors are A-frame 5FT by 10FT (50 sqft), and can easily hold 8 hens. They need to be moved regularly, for the comfort and hygiene of the hens, so they are build on 4 wheels. These are similar to the tractors we are using on our farm, so it is a proven design.
Pictures of our first tractors (built from recycled material) will be posted soon. If we ever sell tractors, they will of course be built with new material.

Monday, September 6, 2010

Incubator Update

Our first egg has been 6 days in the incubator, with the three following, 5 days. So I decided to candle these 4 eggs to check for embryo development. Normally, candling should be done at the eighth day, when blood vessels start to be visible.
One of the four eggs tested showed barely visible blood vessels. This was an egg from Sept 1st, so only 5 days of incubation. The 3 other eggs did not show blood vessel. Two were dark, and one clear. It is probably too early to tell. I may also need a stronger light than an LED flashlight to candle my eggs.
Nevertheless, I know that at least one of my eggs is fertile and developing, so that is a success so far. I will post regular updates of the state of embryo development. This is another pretty exiting project! The fertile egg should hatch on Sept 22nd. Stay tuned!

Here is a good guide about candling eggs:
[ Candling Eggs ]

Thursday, September 2, 2010

2010 Laying Flock

Our flock of laying hens born in 2010 comprises the following:
- 6 Bared Rocks, not all sexed yet, there may be some roosters.
- 1 Leghorn (we had 2, the coyotes got the second).
- 3 Wyandottes
- 8 Ameraucanas
- 2 Golden Sexlink
- 1 Black Sexlink
- 1 Rodhe Island Red.

22 laying hens total. They are still immature, we are getting between 4 and 7 eggs a day. The only one laying every single day is the Leghorn.

Wednesday, September 1, 2010

Another Welcomed Wild Guest

This morning, during my tour, I found a Red Backed Salamander trapped inside a bucket. We had about 2 inches of rain during the previous night, so the bucket was half full of water. Here is this beautiful salamander:

Here is the Wiki page on Red Backed Salamanders:
[ Red Back Salamanders ]
And here is a good link about Amphibians of the Skykomish watershed:
[ Amphibians of the Skykomish Watershed ]
It is always a good thing to find salamanders in your yard, because they are extremely sensitive to harmful chemicals. They are a good indicator that the place where they live is free of those chemicals. They also feed on bugs such as ants or small spiders.
BE CAREFUL though, as some salamanders and newts secrete a poison on their skin. Handling them bare handed may result in a rash. If you handle food with contaminated hands, the result could be deadly. Don't handle them bare hands (like I did, I didn't know until I looked up for information).

Tuesday, August 31, 2010

First Eggs in the Incubator

After setting the breeding flock in the chicken tractor, we got our first egg today. I set it in the incubator. So August 31st is the day our first fertilized egg was put in the incubator.

Breeders and Chicks

Today, we will present the last members of our little farm: the layer breeding flock, and our last batch of broilers for the 2010 season.

First the breeding flock, they are Black Australops, with a pretty strong and mean looking rooster, and three older hens:

The hens are in the end of their second year. One of them became broody last Spring. We should mark them to identify their characteristics (like broodiness) and breed only the desirable characteristics into the next generation. Something to remember next year I guess. The breeding flock is now in a chicken tractor, with two nice nest boxes. We will collect the eggs and put them in the incubator as soon as they are laid, except if one of the ladies becomes broody (then she will get the eggs).

We also have a new batch of broilers. They are between 1 and 2 weeks old in that pic:

They are in our field brooder. They spent their first week inside the indoor brooder, then they are set in the field brooder for their second week. A few days later, the feeder and waterer are set outside the heated area, and the heat is turned off. In this pic, I just refilled their waterer. They were out of water for a few hours, not good. I swapped the waterer for a bigger one. Their eating/drinking rate increases rapidly, and it is easy to get cough not refilling fast enough.

That's it for all our farm animals. We do have a few pets, such as two cats and a peacock. I will publish pictures of them soon. We also have bats, but these are very difficult to photograph, because they fly fast, and in semi-obscurity.

Thursday, August 26, 2010

Beekeeping operation

We have 6 beehives, as of August 2010. Here is the full list:

L1, a Langstroth started in 2009 from a package. We harvested two frames in 2009, and two frames in 2010. It swarmed in Spring 2010 (we were moving at that time, I did not have time to manage it properly).

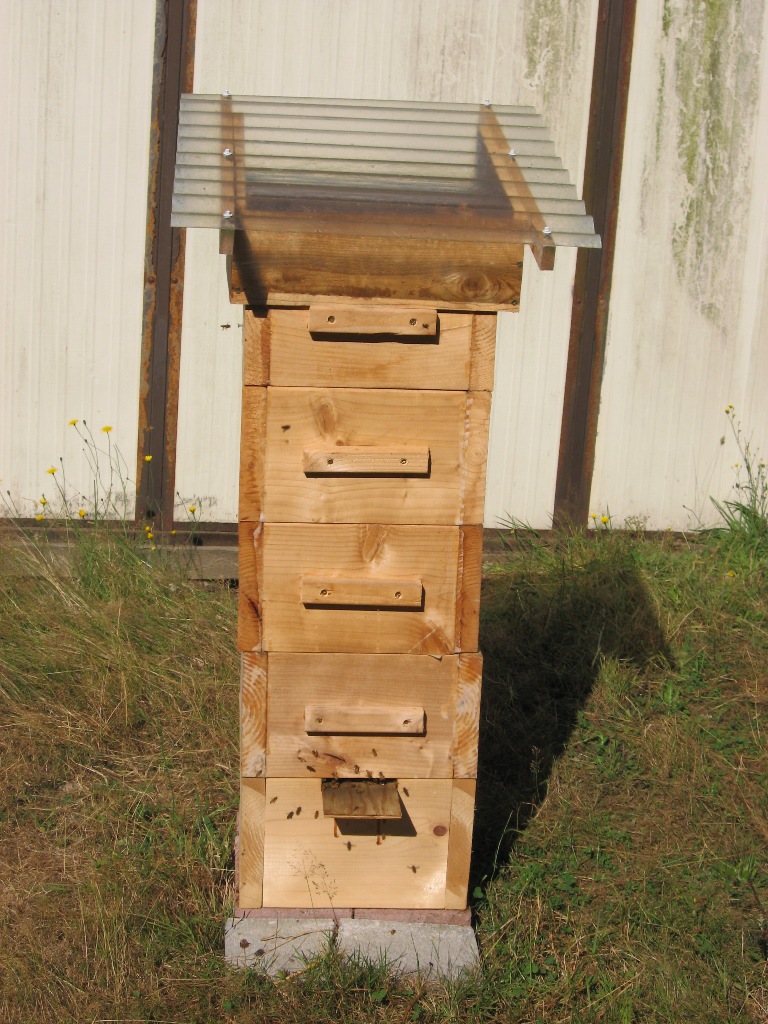
W1, a home made Warré, started in 2010 from a package. No harvest on this hive, but it is doing fine, with two full bodies at the end of the summer:

W2, a home made Warré, started in 2010 from a package. One comb harvested in 2010. This hive is doing well, with 3 bodies full by August. It will overwinter on 4 bodies:

W3, a home made Warré, started in 2010 from a package. This was my best 2010 hive, but I let it starve by mistake, insufficient feeding. The surviving bees were merged with K1. W3 spot is free, and it will be replaced in 2011.

L2, a Langstroth from a 2010 package. It is installed at a friend's house. It is doing OK, with 1 and 1/2 bodies filled.

K1, a small wild swarm from 2010. This is Kristen's hive. K1 never really developed, and it was pushed by a goat, which broke all the combs. K1 will likely not survive the winter, but I will give it a chance by feeding it during September/October.

W4, a home made Warré from L1 swarm. It is installed at a friend's home. Because I did not have the hive ready when L1 swarmed, the top body is actually a Langstroth Medium. W4 appears to be doing good, but is due for inspection and maybe harvest. All other hives were already inspected and partially prepped up for winter.


Total, we harvested 0.7 gallon of honey (without counting W4). It looks mostly blackberry honey, very clear and liquid. We harvested it by slicing the combs with a knife over a strainer, then filtering.
Next year I have requests for more hives, about 3 or 4 more hives. I hope that by Spring 2012, I will have 10 hives that will have successfully overwintered.

Tuesday, August 24, 2010

Geese, Turkeys, Ducks

We purchased 4 ducks back in Spring 2010, but only three survived. Here they are:
The black duck got cough by coyotes. The white duck was injured, but recovered. So today, we have only two ducks remaining, a Pekin pair:
Four Geese were given to us, apparently one male and 3 females:
Unfortunately, the coyotes killed the male, so now we only have the 3 American Buff females remaining. We also have 4 turkeys, two Bronze and two White:
They are getting big, and I am getting worried about processing. The two Bronze will be ready to slaughter around Halloween, and the two White around Thanksgiving.
That's all our non-chicken poultry introduction. Tomorrow we will list the beehives, we have 6 of them total.

Monday, August 23, 2010

First Poultry and Other Residents

Most of these pictures are from May 2010. Here is the poultry flock in their new pen built from a dog kennel:

Here is a peek inside, you can see the ducks, a new addition to the flock:

The star of the flock, Taco. Since she is a girl, I think Taco-Belle would be more appropriate:

Maxie, our dog, patrolling the pasture:

She traded her kennel to the chicks, for a 1 acre pasture.
At the time those pictures were taken, we were working on our deck. After we removed the boards, Kristen found a salamander hiding underneath, so she took a picture of it. The salamander was put in a safe place (a terrarium) during the work, and released back after. This picture was taken just before the release (you can see the new deck in the pic):

I am still browsing through our picture archive. Next I will post pics of our geese.

Sunday, August 22, 2010

Welcome to our farm!

Welcome to our farm. We are a small family owned farm located in the Dutch Hill area. Here is a view of our farm taken in January 2010:

At that time, the only occupants were moles, as far as we could tell. The first animals we introduced in the farm were a flock of laying hens that we had prior to moving into the farm. Unfortunately, the coyotes took care of the hens before we had a chance to take pictures. After securing the fence, we got a new flock:
Here, our Grandson is holding one of the chicks:

Here is the whole flock, in our home made brooder:

We also have two goats, Ziggy (buck, black and white) and Poppy (doe):

Sometimes, we have visitors:

More occupants came later to the farm. We now have ducks, geese, broilers, bees, and even a pair of peacock chicks. We also have two cats: Kalie, and Attila. They have learned to hunt for their food on the farm, Kalie on the field, Attila in the barn. We also discovered long time residents, such as a salamander, and a small colony of bats. More pictures to come!